What's going on in Mr. Solarz' Class?
What's going on in Mr. Solarz's Class?
  • Parents (Newsletter)
    • Our Online Photo Album >
      • 2018-2019 Photo Album
      • 2017-2018 Photo Album
      • 2016-2017 Daily Photo Journal
      • 2016-2017 Daily Photo Journal - Album 2
      • 2015-2016 Daily Photo Journal
      • 2015-2016 Yearbook
      • 2014-2015 Daily Photo Journal
    • Our YouTube Channels >
      • 2018-2019 YouTube Channel
      • 2017-2018 YouTube Channel
      • 2016-2017 YouTube Channel
      • 2015-2016 YouTube Channel
      • 2014-2015 YouTube Channel
      • 2013-2014 YouTube Channel
      • 2012-2013 YouTube Channel
      • YouTube videos over the years
      • Learn Like a PIRATE videos
    • Calendar
    • Our Weekly Schedule
    • FAQ about our classroom
    • Curriculum Night Presentation
  • Educators
    • Danielson Framework >
      • Domain 1 - Planning & Preparation
      • Domain 2 - Classroom Environment
      • Domain 3 - Instruction
      • Domain 4 - Professional Responsibilities
      • Professional ePortfolio
      • Instructional Coach Evidence
      • Experience Logs
    • FAQ about our Classroom
    • Workshops
    • Our Classroom Library is for Sale
  • Curriculum
    • Science Units >
      • 5th Grade >
        • Human Body Unit >
          • Human Body Links
        • Ecosystems >
          • Ecosystems - Legends of Learning
        • Watery Earth >
          • Watery Earth Links
        • Earth in Space
        • Investigating Matter
      • 4th Grade >
        • Energy >
          • Energy Unit Notes
          • Energy Debates
          • Energy Debate Organizers
        • Our Geosphere
        • Waves
      • Science Fair
      • STEM Investigations!
      • Try Engineering Together
    • Social Studies Units >
      • 5th Grade >
        • Revolutionary War >
          • Liberty's Kids Videos
          • Revolutionary War Hero Project >
            • RWHP Directions
        • U.S. Constitution & Government >
          • Mini Lessons
          • Colonize Mars! >
            • Claiming Mars for Ourselves >
              • 2017-2018 Creating our Country on Mars
              • 2016-2017 Mars Decisions
              • 2015-2016 Claiming Mars for Ourselves
              • 2014-2015 Claiming Mars for Ourselves 2015
            • Solutions to Problems on Mars >
              • 2017-2018 Our Solutions to Problems on Mars
              • 2016-2017 Problems & Solutions
              • 2015-2016 Our Solutions to Problems
              • 2014-2015 Our Solutions to Problems
            • 2014-2015 "Mission: Mars" Video Discussions 2015
          • Project Citizen
        • Westward Expansion >
          • Oregon Trail Simulation
          • Oregon Trail Readings
          • Reflection Rotation >
            • 2017-2018 Reflections >
              • ThingLink Photo Stories
              • Green Screen Tableaux Vivants
              • Fictional Travel Blog
              • Canva Concept Cards
              • YouTube Newscasts
              • Google Slide Show
              • Daily Travel Blog
              • Act-It-Outs
            • 2016-2017 Reflections
            • 2015-2016 Reflections >
              • Voki Reflections >
                • Voki Blog
            • 2014-2015 Reflections >
              • Act-It-Outs
              • Timeline Spreadsheet
              • Newscasts
              • ThingLink >
                • ThingLink Images
                • Sign up for ThingLink
              • Google Slideshow
              • Fictional Travel Log
              • Daily Travel Log
              • Tableaux Vivants
              • Photo Stories
      • 4th Grade >
        • Geography
        • Explorers
        • Native Americans
        • Colonization
        • State of Sustainability
      • Presidential Election Simulation - 2012 >
        • Presidential Election Simulation - 2016
      • Current Events
    • Reading >
      • 5th Grade Units >
        • Literature Circles >
          • Literature Circles >
            • Video Discussions
          • Literature Circles >
            • Video Discussions
            • Activities
        • Schoolwide Launch
        • Schoolwide Fiction
        • Schoolwide Non-Fiction
        • Schoolwide Ecosystems
        • Schoolwide Poetry
        • Wonder >
          • Wonder
        • The Phantom Tollbooth >
          • Phantom Tollbooth Assignments
      • 4th Grade Units >
        • Schoolwide Launch
        • Schoolwide Fiction
        • Schoolwide Non-Fiction
        • Schoolwide Poetry
        • Schoolwide Energy
    • Writing, Spelling & Grammar >
      • Writing >
        • Writing City
        • WEX
        • WriteAbout
        • Reflection Writing
        • JoonBugz
      • Spelling >
        • Words Their Way
      • Grammar >
        • Grammar
    • Math >
      • Money Island
      • Math in Focus
    • Miscellaneous >
      • Activities >
        • Short-Term Projects
        • Challenges!
        • Special Events
        • Projects & Mini Lessons
        • Bonus Activities
        • Miscellaneous >
          • Honor Badges
          • Growing a Growth Mindset
      • Imagination Club >
        • Schedule
        • Daily Ritual
        • Mini-Lessons
        • Photo Journal
        • Student Creations Round 1
      • Mystery Skype
      • Entrepreneurship Unit >
        • Entrepreneurship - Creating Our Own Businesses!
      • Self-Reflection
      • KinderPals
  • Student ePortfolios
    • 2018-2019 ePortfolios >
      • Students 1-7 >
        • 1 - Isabel
        • 2 - Alexis
        • 3 - Oscar
        • 4 - Adrian
        • 5 - Edy
        • 6 - Matthew
        • 7 - Molly
      • Students 8-14 >
        • 8 - Joey
        • 9 - Jeremiah
        • 10 - Emmalina
        • 11 - Sama
        • 12 - Hazel
        • 13 - Nick
        • 14 - Filip
      • Students 15-21 >
        • 15 - Nellie
        • 16 - Landon
        • 17 - Molly
        • 18 - Harrison
        • 19 - Kali
        • 20 - Inti
        • 21 - Ryan
        • 22 - Pavel
      • Blog Assignments
    • 2017-2018 ePortfolios >
      • Students 1-9 >
        • Elle
        • Daniel
        • Tommy
        • Alyssa
        • Gavin
        • Milosz
        • Mikey F
        • Caitlin
        • Brynna
      • Students 10-17 >
        • Kya
        • Olivia
        • Ian
        • Colin
        • Owen
        • Gianna
        • Isabella
        • Carmen P
      • Students 18-25 >
        • Lucy
        • Caleb
        • Mikey S
        • Wes
        • Martin
        • Will
        • Shaun
        • Carmen W
      • Blog Assignments
    • 2016-2017 ePortfolios >
      • Students 1-8 >
        • Hailie
        • Jody
        • Madison
        • Dylan
        • Calvin
        • Connor
        • Louisa
        • Harvey
      • Students 9-16 >
        • Anna
        • Jack
        • Ben
        • Elijah
        • Catelyn
        • Cole
        • Abby
        • Ashley
      • Students 17-23 >
        • Charles
        • Michelle
        • Charlie
        • Daniel
        • Sam
        • Chingoon
        • Kyren
      • Blog Assignments
    • 2015-2016 ePortfolios >
      • Students 1-9 >
        • TJ
        • JJ
        • Bridget
        • Alex
        • Mason
        • Ryan
        • Lucas
        • Shreya
        • Logan
      • Students 10-18 >
        • Charlotte
        • Addie
        • Aidan
        • Andrew
        • Jeremy
        • Rachel
        • Russell
        • Addy
        • Cassidy
      • Students 19-26 >
        • Audrey
        • Regan
        • Giuliana
        • Brady
        • Stephen
        • Matthew
        • Ben
        • Tyler
        • Thomas
      • Blog Assignments
    • 2014-2015 ePortfolios >
      • Students 1-7 >
        • 1 - Michael
        • 2 - Charlie
        • 3 - Nicole
        • 4 - Stacy
        • 5 - Bela
        • 6 - Kendall
        • 7 - Demetri
      • Students 8-14 >
        • 8 - Emily
        • 9 - Nicky
        • 10 - Hanna
        • 11 - Payton
        • 12 - Hasanain
        • 13 - Tucker
        • 14 - Chris
      • Students 15-21 >
        • 15 - Madi
        • 16 - Aidan
        • 17 - Luke
        • 18 - Kaela
        • 19 - Ryan
        • 20 - Alison
        • 21 - Lucas
      • Blog Assignments
  • Passion Time
    • Passion Time Resources >
      • ALL Passion Time Resources
      • Step-By-Step Directions
      • Submit Your Essential Question
      • Our Trello Page
      • Our Passion Projects over the years
      • Our Trello Board
      • SAMPLE Blog Post Format
      • YouTube Upload Page
      • Mini-Lessons
    • 2018-2019 Projects >
      • Round 1
      • Round 2
      • Round 3
      • Round 4
    • 2017-2018 Projects >
      • Round 1
      • Round 2
      • Round 3
      • Round 4
      • Round 5
    • 2016-2017 Projects >
      • Submit Your Essential Question
      • Mini-Lessons
      • Round 1
      • Round 2
      • Round 3
      • Round-4
      • Round 5
      • Round 6
    • 2015-2016 Projects >
      • Round 1
      • Round 2
      • Round 3
      • Round 4
    • 2014-2015 Projects >
      • Round 1
      • Round 2
      • Round 3
      • Round 4
      • Round 5
      • Round 6
  • Student-Led Classroom Info
    • Our Learning Experiences
    • 21st Century Skills
    • Whole Class Goals
    • Individual Goals
    • Classroom Jobs
    • Collaborative Responsibilities
    • Rituals & Routines
    • Uses of "Give Me Five"
    • Student-Led Mini-Lessons
    • Lit Circle Signposts
    • Mystery Skype Jobs

How to add rows in a Google Spreadsheet - By: Addie

5/17/2016

0 Comments


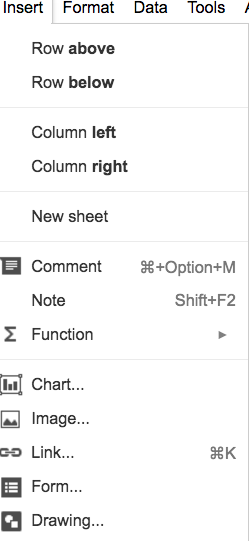
        My student led mini lesson is adding rows to a google spreadsheet. This is a very simple but helpful task which we have used on multiple such as science fair prep for our data sheets and a few other things. All you have to do is gather up the people you are teaching it to go to insert and then column left. This is a super easy mini lesson to teach it is really short but a few people don't know how to do it. You may want to do the certain parts of the mini lesson over or since this on is so short all of it.
        This mini lesson is very important because without it we would have to ask Mr. Solarz how to do it and then we would have to be teacher lead. If Mr. Solarz doesn't know, which sometimes he doesn't, we would just have to stop at 26 columns when we might have more to say.
Picture
Picture
0 Comments

How to Use Video Editor - Brady

5/17/2016

0 Comments

 
This mini lesson is how to use video editor in Youtube. You just do an example of using Youtube video editor and using all of the things you can do in video editor and how to use it.  Make sure to walk through this mini-lesson slowly so that the audience understands how to use video editor. Also make sure to say "do you understand it?" because if they don't understand and you keep on going, what's the point?
           This mini lesson is important because most people don't know how to use video editor, or even know what it is. Video Editor is an awesome part of Youtube that allows you to edit videos with many different things (in video). If this mini lesson was not done, people would not know how to use Video Editor. Like I said, you can do many cool things with your videos on Video Editor.
           This mini-lesson makes us a student-led classroom because we do it as students. Pretty much all student-led mini lessons  all mini lessons makes us a student-led classroom because we lead the mini-lessons. If we didn't do it on our own, the teacher would have to do the same min-lesson except he may make us all watch the mini-lesson.
​

0 Comments

Teaching a different way to do something (For example if we had to download somthing as a jpeg and some coputers don't have the option as a jpeg) - Tyler

5/12/2016

0 Comments

 
          So say that were working on Science Fair and you have to download an image as a jpeg, but then some of the older computers don't have the option to download as a jpeg. You could a student led mini-lesson on how to download the same picture or slide as something different. Then they would gather around the kid who's doing the mini-lesson and don't forget that you have to go in the corner and try not to interrupt what Mr. Solarz in talking about. I also have some extra little tips and tricks that help with this particular student led mini-lesson. The first little tip is to try and make this mini-lesson pretty short so that you and the people who are watching you mini-lesson can get back working on the thing that they were working on. 
         Alright so this mini-lesson is very important because if we didn't have this say that you didn't have a computer that had the option of say a jpeg and we supposed to download it as a jpeg you would be lost and won't know what to do. And if someone was just sitting there and doing nothing getting lost Mr. Solarz would get very mad at you. He would actually get mad at the whole class because nobody would do the mini-lesson to help those kids who didn't know how to do it. And if a kid did this mini-lesson wrong then the kids who came up to him to gain the knowledge that he had to give to them wouldn't really know how to do it. Also if the kid who was doing the mini-lesson was being to loud or disrupted the class then Mr. Solarz would get mad at the kid who was doing the mini-lesson and the kids who were watching the mini-lesson because they were going along with it.
          So what really sets this mini-lesson off from the others is that it all done by the kids because duhh this class is a student-led classroom. So say that Mr. Solarz had to each mini-lesson up on the board and we all had to watch it even if we didn't need the help and that would just slo the whole class down.
0 Comments

How to make a survey on google docs.

5/11/2016

0 Comments

 
        For this mini lesson you will be showing other students how to make a survey on google docs. So first you will have to sign in on you google drive and you add a new blank form. Once you have a new form you will title your form and give a short description of the form you are about to share with other students. For each question you will add a title and you will add a couple different options for the answer, you can also add a question that you answer in paragraph form. You are also able to change the theme of you survey or put a picture at the top of your survey for maybe what it is about. Once you have wrote all of the questions you press send so that other people are able to take the survey.      
        This mini lesson is important because some people may want to make a survey for passion time or for some other activity to see what other people think of a certain topic. If this mini lesson was not done well the survey that some one has made may be confusing or not make any sense.
         This mini lesson makes us a student led classroom because if one person knows how to do it they can share with anyone who would also like to make a survey. If the students did not do this mini the teacher would have to stop the whole class and project how to do it. The teacher would have to do it for the kids who did not want to know how to make a survey or that they already knew how to make a survey. 
                
0 Comments

How to upload videos to youtube by: Andrew

5/11/2016

0 Comments

 
In this mini-lesson I taught kids how to upload videos to youtube. I showed them how to drag the video in, name it, and also how to publish. 
The mini-lesson was important because we upload a lot of videos every day. If was not done right we would not be aloud to make videos anymore and that would not be fun.
This mini-lesson make our classroom a student led classroom and not a teacher led classroom because the students are teaching others and the teacher.
0 Comments

Showing Others How To Log In Into The Recap App - Audrey 

5/11/2016

0 Comments

 
          So one of the mini lessons that I did was showing others how to log into the recap app because I figured out how to do it and the class was still struggling to find out how to do it so I decided to show the class how to log in. So to do this mini lesson, you do a give-me-five and tell the class that you are going to do a mini lesson on how to log into the recap app. Then the people who wanted to know how to do it will then crowd around you and you show them how to log in. Some tricks and tips for doing this mini lesson is to make sure that you are loud enough so the kids who are around you can hear you telling them the directions. Also you have to make sure that you go slow so the people who are trying to learn how to log in catch what you are saying. 
          This mini lesson is important because Mr. Solarz was trying to get everybody to log in and if nobody did this mini lesson than none of us would know how to log into this app. Also Mr, Solarz wanted his next year class to also use this app and if he didn't find out how to get everybody into the app then his next year class won't be able to use this awesome app. 
          This mini lesson that I did made our classroom a little bit more of a student-led classroom because I got to run the mini lesson and I am a student so that makes the class a little more student-led. If I didn't do the mini lesson and Mr. Solarz did it than it would be more of a teacher-led classroom because the teacher would have to run the mini lesson instead of a student. 
Picture
Picture
Picture
0 Comments

How to freeze rows on a google spreadsheet. By: Cassidy

5/11/2016

0 Comments

 
      This mini lesson is when you do a give-me-five and go up on the white board and project it to the class if the whole class is having trouble. If the whole class is not and a couple of kids are having trouble go into the corner or where you can not disturb anyone that is not having trouble with this skill. Some tips or tricks to this job are you have to be really loud and know what you are doing. During the mini lesson if you have a problem make sure that you clarify that this will not happen when they do it, and say that it was a glitch and it probably will not happen to them in less it glitched on them too. When you are done with the mini lesson you have to ask if there are any questions. If there are some that you have no idea what the answer to one question is then you can tell them that you are not sure you will give them your best knowledge on their question.
        This mini lesson is important because if we did not do this mini lesson we would have a lot of trouble with our spreadsheet. For example, during Colonize Mars  for our responsibilities we have to freeze the top because you have to know what to put in each column.  If we did not do this during school wide our whole spreadsheet would have been ruined. As you can see with out this mini lesson our whole organized spreadsheet would be ruined. If this mini lesson was not done the whole spreadsheet would probably be a big unorganized mess. 
         This mini lesson makes us a student-led classroom because The students are leading the mini lesson not the teacher. This is one of the big ways that we are a student led classroom because we realized that people are having trouble and that you figured it our so you do a give-me-five then you lead the whole mini lesson by your self! If the teacher were to do this mini lesson they would probably stop the whole class even if you are doing great and finished that part already and make it more difficult then it actually is.  
0 Comments

Helping People Import Videos Off iPads and Other Devices - Russell

5/11/2016

0 Comments

 
This mini lesson is to tech people how to import videos off and iPhone iPad iPod. When doing this mini lesson you need to have a Macintosh with you updated to OSX Yosemite or later. You will open the computer plug the iPad or iPod into the computer and the Photos app should open up. When the Photos app opens you want to hit import when you hit import you want to select the photos you want by holding command and clicking all the photos that you want. As soon as you do that click import E.G. 6 photos and they will start to import. When they are done importing drag all the photos you selected to the desktop and they should appear on the desktop. (This Works For Videos Too)

If this mini lesson was not done good at all we would not be able to get pictures off the iPods iPads etc. The pictures can be very important. 
0 Comments

Deleting Videos From The Swivl - Charlotte

5/11/2016

0 Comments


Deleting Videos From The Swivl

    My mini-lesson is to teach people how to delete videos from the Swivl.  First what you do if you are in capture you stop the current video by tapping the flashing red circle on the screen.  Then you go over to to 3 lines in the left corner and you tap on them.  That should bring you to another screen where the videos are stored.  If the video has the words "uploaded today" on it then you are allowed to delete it because it was already uploaded to YouTube.  You then tap the 3 dots at the bottom of the box that holds the video.  You click that and there are 3 options that you can do.  You are going to want to click the option that says "delete" with a little trash can above it.  After you click it, it is going to ask you if you are sure you want to delete it.  If you are, click delete.
     If this mini-lesson wasn't done well then something might get messed-up on the mini-iPad because this job is important because it is done on technology so something could be easily messed up of it.  if this job isn't done at all then it would be even worse because there wouldn't be any storage on the iPad and you wouldn't be able to record any new videos on the swivel.
     This mini-lesson makes us a student-lead classroom rather than a teacher-lead one because if the teacher were to do this mini-lesson rather than a student, it would be a teacher-lead classroom.  The teacher would have to teach this mini-lesson, if a student didn't, and that would take time out of their day trying to teach you things.  So if a student did this, and a teacher didn't, it wouldn't take any time out of the day fro the teacher and they could keep planning or the day.
0 Comments

How to print out your Science Fair Slides in Crome. By: Alex

5/11/2016

0 Comments

 
      One example of a mini lesson that you can do is how to print out your science fair slides in Chrome, (I did this as a mini lesson.) What you do is you do a give-me-five and tell everyone what the mini lesson you are doing is and take them to a corner or somewhere out of the way. (I forgot to do that so make sure you take them to a corner.) Then you are going to tell them what to do so in this case you would go to your slide and go to file, then download as, then its a PDF document. Then it downloads and is on the bottom of your screen, then you open it it will come up in a tab. (Which you don't need.) Then it will either be in your downloads folder or the desktop. and you drag it to the desktop if it is in your downloads folder. Next you double click on it and it should open Adobe Acrobat and the little print symbol will be in the top left hand corner. You then click on it and select the printer, (room 128 ricoh if its in black and white, color is LMC color printer one or two.), you select the pages you want to print, then custom scale 70% so it fits on our backboard.  
      This mini-lesson was really important because people didn't know how to print out the slides they needed. So Mr. Solarz told one person (me) how to do it and so I went into a corner and did a Mini-lesson on how to print the slides.  You needed your Science Fair slides for the presentation so it was really important we got this was only in Chrome so I'm not exactly sure how to do it in Firefox. But my guess would be that it would be similar to Chrome. If this Mini-lesson wasn't done at all Mr. Solarz would have to do a mini lesson on it. This would then waste more time that we could be spending making our slides and backboards.
       This Mini-lesson makes us a student led classroom because when someone else does a Mini-lesson you have a choice to keep working or to go find out what the Mini-lesson is, if you are interested. But when Mr. Solarz does one everyone has to stop what we are doing and make everyone listen you have to watch his Mini-lessons, because he does them when we can't figure something out. The teacher would then have to waste everyone's time (except for those who need it) instead of a kid doing one where you can not listen, it is your choice if a kid does one.
0 Comments

How to make a Bit.ly - Ben

5/11/2016

0 Comments

 
          Hi i'm Ben, and the mini lesson that I chose was one about how to make bit.ly. If you don't know what a bit.ly is it is simply just a link shorten-er. So how to do this is first copy your link that you will be giving out to people, then after that you will have to go to  https://bitly.com/ or you can just type in bit.ly and it should come up. So once you are in bit.ly, there should be and open typing space in the middle of the screen. You then click on that open space and copy your link into it. Then bit.ly will make it much shorter and easier to type in. This helps a lot when making surveys for the whole class or sharing a document with a lot of people. If you have a bit.ly account (I do not) you can then make the link custom such as making the name bit.ly/marsconstitution which a person in my class who has a bit.ly account has made. So this mini lesson is very important yet simple for others to master so it makes the classroom move faster and be better
          If we did not have this mini lesson no one would know about bit.ly except for some kids and for kids to search up a link they would have to type in the whole address. bit.ly is very important because in our class we almost are always using computers and all of us are usually working together on a dock and will need and easy way to get to it, such as one recently created by one of my classmates - bit.ly/marsconstitution which you saw earlier in this mini lesson blog. So this mini lesson is very important and without, there would be no short links and in are classroom, which is always using computers, could not live a day without shorter links. So my name is Ben and I hope you and others will be masters at this mini lesson!
Picture
0 Comments

Showing a Tip/Shortcut to Use on Computers - By Regan

5/11/2016

0 Comments

 
          This mini-lesson's purpose is to show the class something that will be useful, like a tip, trick, or shortcut that they don't already know that will be useful later on. An example is if somebody doesn't know how to take a screenshot and is struggling with it because that is part of an assignment that they needed to complete. If you did happen to know, you would have to simply say "give me five, give me five, I have a mini-lesson on how to take a screenshot, and you would then let people come to you as you explain how to do whatever you want to do a mini-lesson on. Some tips are to show people what you are doing while explaining it, so they have a better visual of what to do when they gat back and have to do it on their own.
          This mini-lesson is important because people might be assigned things that they don't know how to do, and you may be the only one who knows how to do it. If you didn't tell people how to do whatever they are failing to do, the entire class will have missed the assignment. If you are able to do a mini-lesson on any of the technology tips, anyone who didn't know would now come to you for help, and would then succeed.
          This mini-lesson makes us a student led classroom because if we didn't do mini-lessons, the teacher would have to tell us how to do it, making us a teacher-led classroom. We are a student led classroom with this mini-lesson because we can show others how to do things that the teacher can't show us.
Picture
Credit: https://debkuhr.wordpress.com/2013/06/14/teaching-point-of-view-via-podcasting/
0 Comments

Teaching The Class Tips For IMovie - Addy

5/9/2016

0 Comments

 
This mini lesson is quite simple. All you need to do is do a give me 5 during passion time and ask if people want to know these awesome tricks! If you don't know what IMovie is, then I will explain it. IMovie is a app you can get on a tablet or on a computer. It helps combine videos together and add some glare to it! Here are some tips you can share if you are doing a mini lesson about it. Tip one: Never videotape with the IMovie camera, use photo booth or the camera on a tablet. Tip two : You can make and voice audio for a video in a app. There are so many more, but you need to help your peers now!
           If this mini lesson was not done, then lots of people would learn the struggles of IMovie the hard way! IMovie is a frequently used app and surprisingly , it isn't perfect! This mini lesson also helps clarify some of the kinks. If this mini lesson was not taught well, then again, many people would walk away wondering and having to figure out things for them self! It doesn't help that IMovie is a very complicated app, but it still should be taught and trust me, this mini lesson will help you!
          This mini lesson makes a classroom very student led because then your teacher does not have explain all of the tricks to IMovie! If your teacher has already told you how it works, then if you do a mini lesson reminding your peers, they will probably appreciate lots! This will also make your teacher very happy because they won't have to make a whole lesson explaining it again! This also makes it student led because you are saving grief from other people and they will be very happy for that! 
0 Comments

Short Description of Mini-Lesson - By: ________

5/7/2016

0 Comments

 
Paragraph 1: Write a very clear summary of the mini-lesson that was taught by a student and any hints, tips, or tricks for doing it well.

Paragraph 2: Explain why this mini-lesson was important and what might have happened if this wasn't done well (or done at all).

Paragraph 3: Explain how this mini-lesson makes us a STUDENT-LED CLASSROOM rather than a teacher-led one (What would the teacher have to do if the students didn't do it on their own?)


Paragraph 4: (Optional) Share any ideas you have that could make this ritual or routine even better.
Picture
Have someone take a picture (or several) of you "teaching" this mini-lesson.
Create a video pretending to teach part of the mini-lesson. It just needs to be 30 seconds or so (enough time for viewers to get an idea of the lesson).
The Google Sheet with everyone's list of Mini-Lessons: https://docs.google.com/spreadsheets/d/1Neez-_swIjPDYfQ3nFZa_YazfMOouuNGrkMb4mCElpg/edit#gid=0
0 Comments

    Student-Led Mini Lessons

    In our classroom, students are encouraged to teach each other skills and concepts whenever possible so that the teacher doesn't have to. This blog is a collection of several of those mini-lessons from the 2015-2016 school year.

    Archives

    June 2016
    May 2016
    March 2016
    February 2016

    Categories

    All

    RSS Feed


    Student-Led Mini Lessons:
    • How to make movies on QuickTime Player
    • Writing important announcements on the board
    • How to embed a Google Slideshow into a blog post
    • How to add rows in a Google Spreadsheet
    • How to use YouTube Video Editor
    • Teaching a different way to do something
    • Adding page numbers to our Science Fair slideshow
    • How to set up the morning announcements
    • How to make a survey on Google Docs
    • How to upload videos on YouTube
    • How to log in to the Recap App
    • How to freeze rows on a Google Spreadsheet
    • How to import videos off iPads and other devices
    • What you need on your Science Fair poster board
    • How to delete videos from the Swivl App
    • How to print out your Science Fair slides in Chrome
    • How to make a Bit.ly (URL shortener)
    • Giving tips and shortcuts that will benefit others on the computer
    • Teaching the class tips for iMovie
Powered by Create your own unique website with customizable templates.